
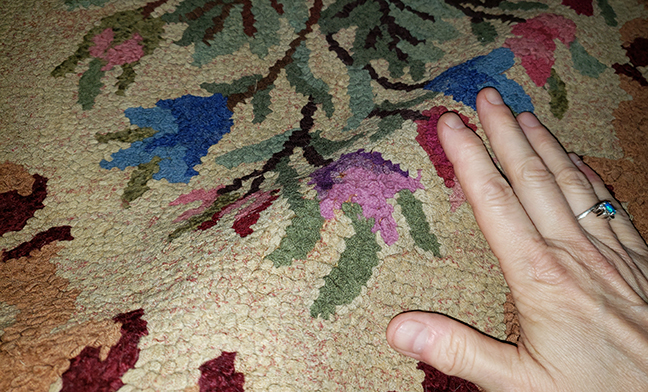
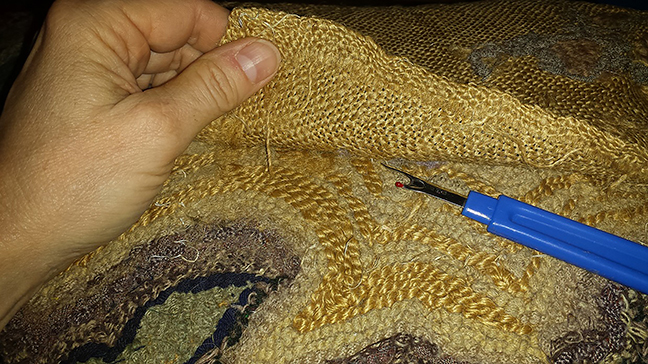
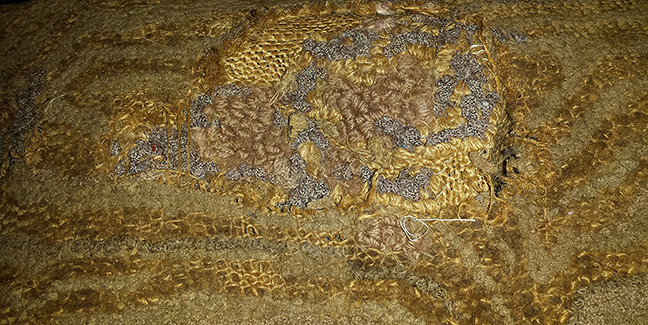
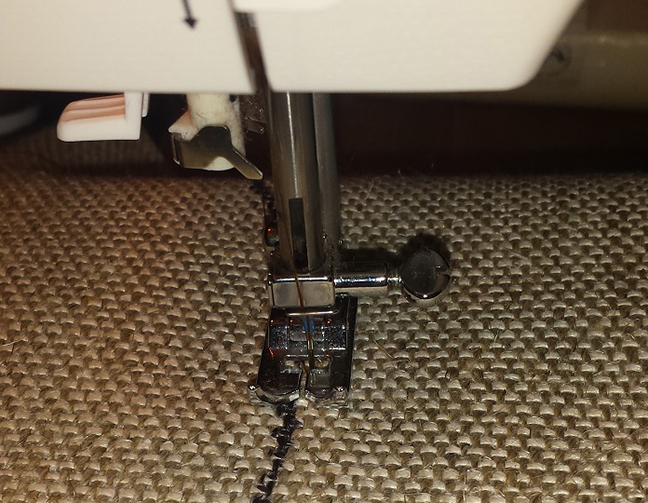
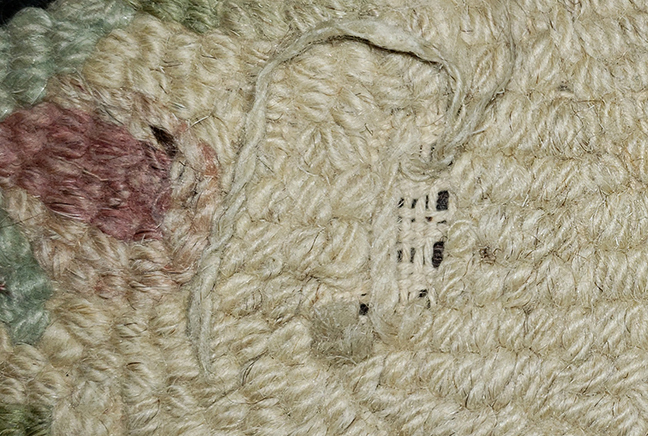
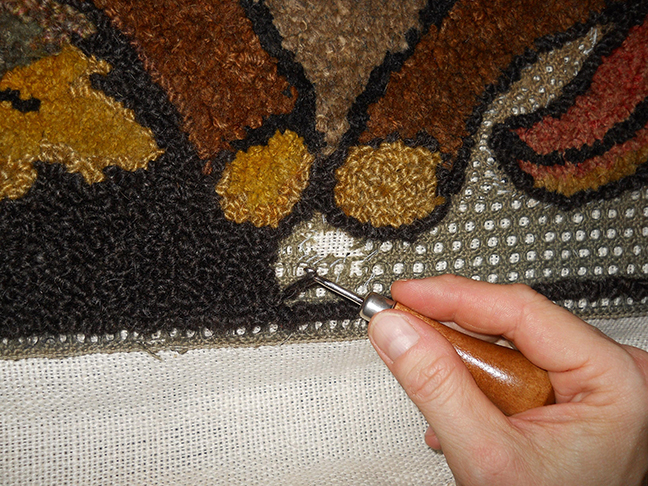
Sometimes an old hooked rug, otherwise in good condition, will show a hole, the work of a rat’s teeth or flying sparks or other accident. In mending such a rug, a knowledge of the technique of hooking is required. The worker applies a piece of burlap to the back of the rug, following the weave of the original foundation, which is usually parallel with the edges; this burlap is then sewed to the firm edges around the hole, and material exactly matching the surrounding color is hooked in (through both layers).
Elizabeth Waugh and Edith Foley, Collecting Hooked Rugs, 1927
There are two main categories when it comes to rug repair; damage to the hooked material and damage to the backing. Every rug repair job is unique, and you have to improvise as best you can to make an old rug healthy again. But one of the most brilliant things about the invention of rug hooking is that we can almost always restore a hooked rug to health, so it can go on gracing our floors for many decades to come.
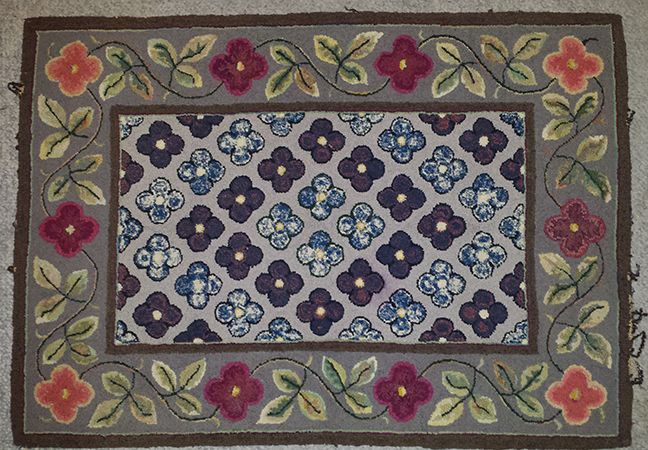
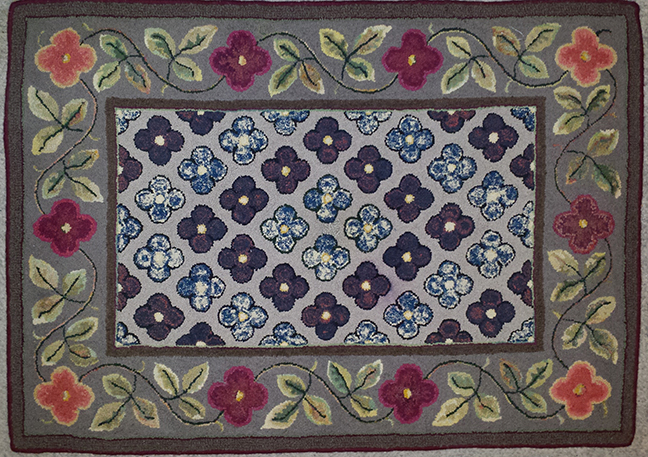
If the rug gets stained, snagged, or the hooked stuff is just gone (but no damage to the backing), you have several choices to consider with the owner of the rug. One, you could try to match the color, which as a rule, isn’t my preference. Not if there’s a way I can restore the rug without obvious blotches or blemishes. I can’t ever guarantee that my repair will be invisible or not noticeable, but it’s always my hope. Then again, sometimes the fiber gods smile down upon my workshop, and I find the perfect color right on the shelf.
A second strategy to rehook a spot that is stained or missing is to introduce a new element that goes with the design, like a new flower or leaf, or like the clouds in the Winnie the Pooh rug (shown later in this chapter).
And the third option may be to rehook a whole section of a rug. I often suggest this option when I’m rehooking the outer border of a rug. Of all the work I do, rug hooking is the easiest and most fun, so if I can make a more perfect repair that way, I will offer that remedy.
If there is damage to the backing of the rug, that’s more serious. I’ve come across many efforts to stop the damage, including sewing the hole closed, using glue or latex, or just sewing fabric into the back of the rug to cover the hole. Unfortunately, these remedial efforts only put more pressure on the already weakened fibers. They tend to make the damage get worse faster.
The thing about damage to the backing is that once it gets started, it will continue to spread in slow motion. You might notice a bit of yarn or fabric strip has come loose, especially along the folded hemline on an old rug. Eventually, the damage spreads into the rug.
Don’t assume the kitty has been at it. Take a look, really feel the backing underneath. If it gives way, there’s only one way to stop the damage and make it healthy again. It’s a mantra I repeat often:
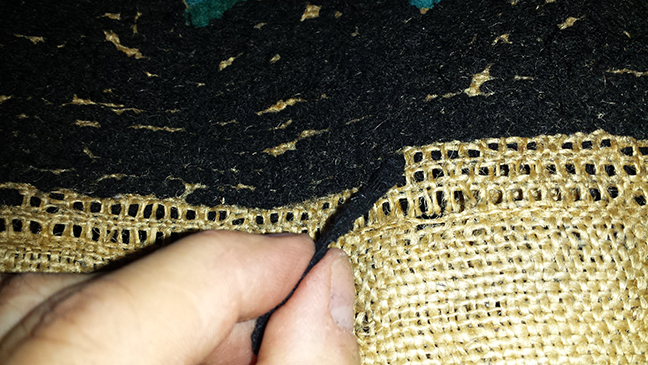
To repair damage to the backing, you must unhook the rug until you get to healthy backing, sew in a patch, and rehook through both layers.
Once you’ve done the patch, then you have to consider all the other strategies from the first category; whether to try to match the color or colors, create a new design element, or rehook the section.
I have only had one rug brought to me that was past repair. It was a lovely old rug, with a basket-weave design. Over the internet, it looked fixable, but as soon as I touched it, I could tell it was brittle. The burlap and the wool strips had rotted. Maybe it had spent many years on the back porch, but in any case, that old thing had given its all to its owners. But happily, most rugs can be restored.
I tell my customers that my job is to do just what your grandmother would have done. She would have used what she had, and got the job done!
Most of my inquiries come via email, usually with a photo attached. There’s a limit to what I can glean from a picture, but I try to give feedback on what I can see. To give an accurate quote, though, I really do need to see and feel the rug in person. Then I can take a close look at the damage and take lots of photographs. I recommend they insure their rugs for a minimum of $100/sq. ft. (replacement value for insurance purposes) when they ship them to me.
Valuing a rug is a tricky prospect, but I found a great resource online, that was done up by the Lighthouse Rug Hooking Guild of Nova Scotia (https://www.encompassingdesigns.com/blog/how-to-value-and-price-hand-hooked-rugs).
They broke down the pricing structure by features (type of backing, amount of detail, hand-dyeing, etc.) for new hooked rugs. Of course, old hooked rugs have other elements to consider, such as provenance and condition. I believe collectors of hooked rugs take some wear and tear into account. However, if the damage to the rug is extensive, that can certainly bring down the value. That’s when it’s advantageous to do repairs. If your customer is aware of the actual value of the rug, they can consider that along with your repair quote. Advice from an antiques dealer can be helpful, if they have expertise with hooked rugs.
I look first at the hemline, the most common area to succumb to wear and tear. Then I carefully go over the rest of the rug, with my left hand feeling the back for any signs of weakness or breakage.
My next step is to prepare a detailed quote on how to restore the rug, with lots of pictures and suggestions of what I can do to address the damage. Personally, I’m more comfortable agreeing on a price ahead of time, rather than charging an hourly rate. I never know how long a task will take, so I wouldn’t want to “nickel and dime” my customer. There are times when I have to try multiple colors to figure out the best match, so if we agree on the charge ahead of time, I can take all the time I need to get it done right.
If the repair involves separate tasks, I like to break my quote down into individual repairs, so the owner can decide which repairs to have done, and whether to continue with the repair. That way it’s clear how much to charge for the parts that got done. It’s good to have an agreement in writing, so it’s clear to both parties what is going to be done. Once the customer has decided they want to go ahead, I ask them to print up the email containing my quote, sign and date it, and mail or email it back to me. I am going to be altering a prized possession, so it’s best if all parties understand what is going to happen.
Then I keep them updated as the project progresses.
Here are some examples of repair jobs. As you read about each project, you’ll get a good idea of what kinds of repairs are possible.
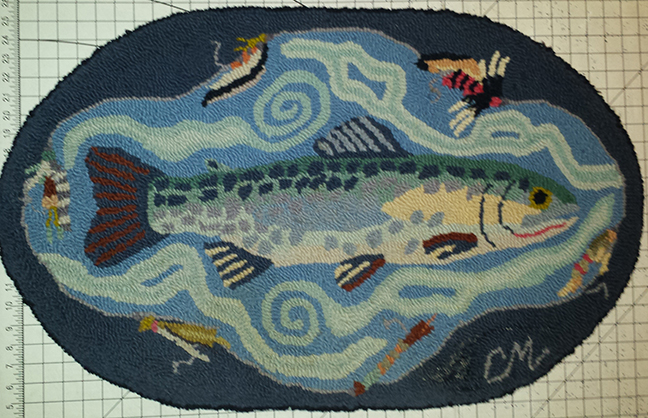
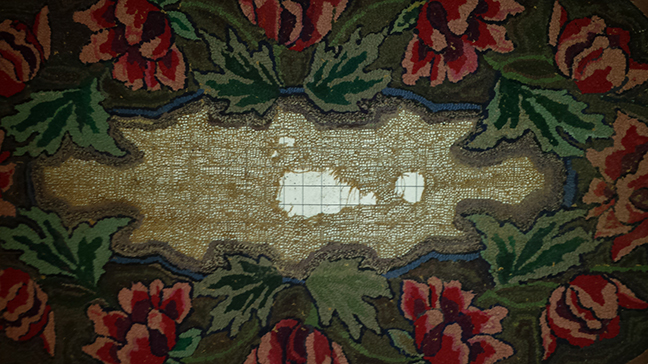
Salmon Rug before, 29”x21.” Wool yarn on cotton.
This salmon rug was in good shape, except for some yarn that had pulled out in the lower right-hand corner, just to the left of the Claire Murray signature.
There was a mesh material lightly glued in the back. Fortunately, it was easily removed.
Rather than fill in with a yarn that didn’t quite match, I suggested moving some of the outer blue yarn to partially fill in the empty space, and to introduce a slightly darker blue to intersperse in the areas I unhooked. That gave the outer background a “watery” look (below).

Then I bound the edge with the same darker blue yarn to pull it all together, and completed the hem.
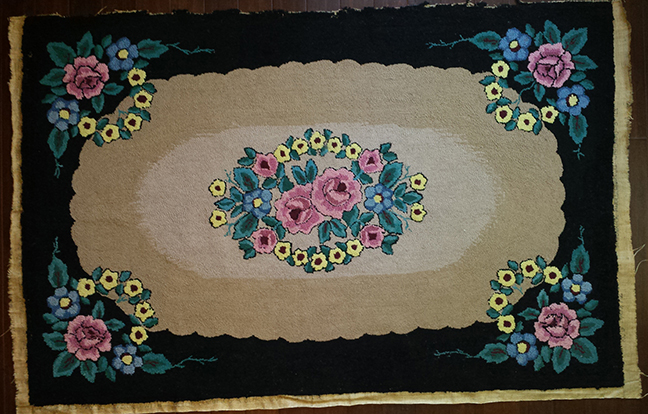
Louise before, 68”x32.” Wool fabric strips on burlap. Shown here with the hem unsewn. Notice that on the upper edge, the burlap hem had given way and was gone completely.
This old rug was in nearly perfect condition, except for the folded-under hem. As you will see, this is the most common problem with rugs that didn’t have bound edges. Here, I gave the owner two choices; one, I could reduce the size of the rug by 1” and bind the new edge to prevent future damage, or two, sew in a patch to keep the rug its original size. She opted for the latter. I suggested adding a new colored border to the outer edge, rather than having me try to match the aged black background. She chose the aqua color from the leaves for a 1” border.
I unhooked about 1” (above) and tried to keep all the strips that would still be hookable. Sometimes you can’t rehook the old strips, but some of these were solid enough to keep. What I didn’t need to finish the repair, I put in a bag for her to keep, in case the rug needed future repairs. I also sent her a ball of the yarn I used for the aqua border.
Creating the patch:
Usually, I make my patch out of the same material as the original rug. I figure new burlap is going to be much stronger than the original anyway, but in the case of this rug, I opted for a linen patch. It was such a large rug, I was concerned that every time it got picked up by the edge, it might cause future weakening of the original burlap. Linen would give more support and bear the weight if the rug was lifted by the edge.
The downside of using linen is that if someone looked at the new hem on this rug, they might assume the whole backing was made of linen. The owner of the rug (a relative of the hooker who made it) agreed with me that, while it may be slightly misleading, it was probably never going to be sold. It would remain a family heirloom, so in the interest of making it a strong repair, we went with linen.

The first step was to lay the rug face down, and pin the linen yardage to the back. Then, with a sharpie pen, I marked the line where I would cut out the middle of the yardage (above).
I could have sewn in strips of linen along the sides, but that would create extra bulk along the corners. By creating a patch out of one piece of cloth, I could proceed to hem the rug in the usual way, wrapping the backing around a cord, and whip-stitching the edge to protect it from future wear and tear.

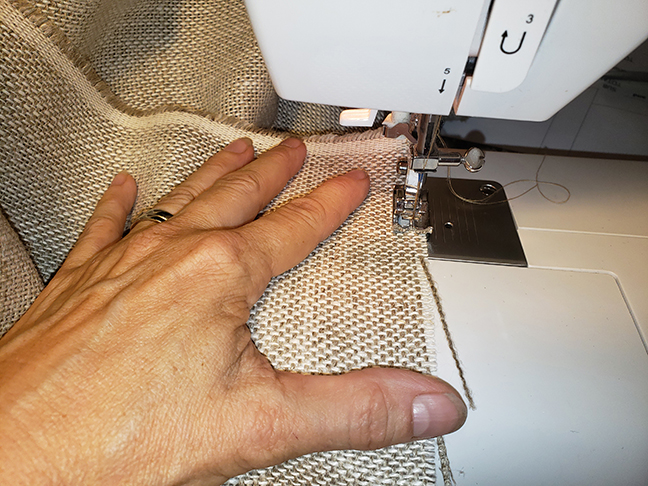
On my sewing machine, I zig-zagged a couple of times around on the sharpie pen line that I drew (above).
Then I zig-zagged along the cut edge of the hem, so it wouldn’t unravel while I did the rehooking.
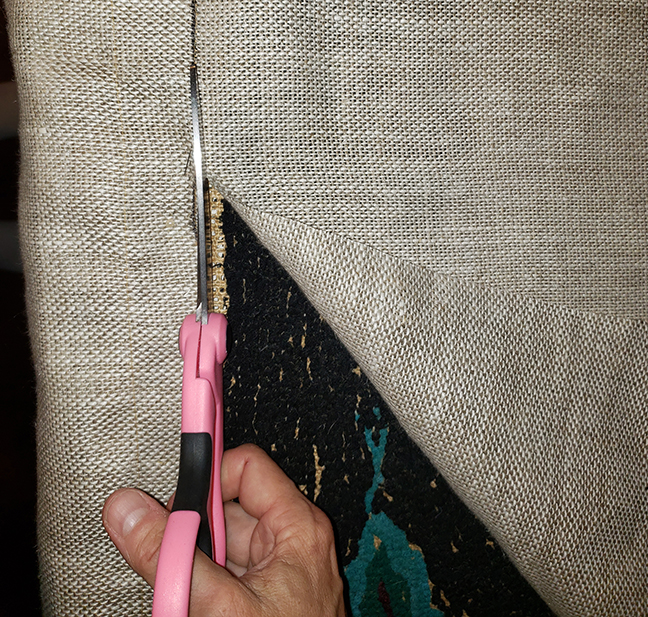
I placed the reinforced linen onto the back of the rug, pinning it into place. Then I carefully cut away the inside, so the patch only covered the outer part of the rug (above).
Why should you cut out the middle of the patch? So that you can get in and fix any future damage that may occur. The golden rule of rug hooking is never put anything into a rug that you couldn’t easily take out. Remember, the
reason these rugs last so long is because they are fairly easy to repair, so don’t do anything that will make that difficult in the future.

For the most part, the damage to the burlap was around the foldline, but there was one spot where the damage had begun to encroach further into the rug, so I made sure my patch was able to accommodate that part as well (above).
I hand-sewed the patch to the back side first (below).

After sewing the patch in to the back, I flipped the rug over and trimmed away all the weak parts of the original burlap (below).

Usually, I would zig-zag the original burlap as well, but with a rug this large, I couldn’t get it up to my sewing machine without manhandling the rug, which wasn’t advisable. I just made sure my hand sewing was thorough.

Then I hand sewed the old burlap down to the linen patch all around.

I also sewed down the hole that had encroached beyond the foldline. I wanted to preserve all I could of the existing burlap, only trimming away any loose threads.

With a sharpie pen and a yardstick, I drew in a new edge for the black section.
I hooked a row of the aqua yarn, then I filled in behind it with some of the original strips, so there was no obvious color change in the black area (below). It’s rare that the original strips are hookable. Sometimes they develop weak spots on the top, or they’re faded on top and brighter on the bottom.

I hooked six rows of the aqua yarn, to create the new border. I hooked through both layers, the original burlap and the linen patch.

Louise after, 68”x32.” Wool strips and yarn on burlap. Here you see the rug restored with a bound edge, and an aqua border to avoid a blotchy match of the black background.
Lillian before, 27”x45.” Wool fabric strips and yarn on burlap.
This rug had held up remarkably well, except for some spreading damage in the center.

A close-up of the damaged area from the front.

A close up of the same area from the back, showing a previous attempt to rehook with a new patch, which only connected to the rug by the hooked loops, putting more strain on the weakened burlap backing.
The first step was to unhook the burlap patch in the back, then I unsewed the burlap patch.
Here’s what it looked like after I took out the patch and the loops. What was left was an earlier attempt to hook through and around the holes. But without unhooking to the healthy backing, the burlap continued to unravel.
Here’s what the rug looked like when all the sewing and hooking of the center section had been removed. Now we can see all the weak spots, and put in a proper patch.

Since the rug was originally hooked on burlap, I used that for the patch. With the rug lying face down, I pinned the new burlap in place, then drew a line with a sharpie pen where the pins were.
Then I unpinned the patch, and zig-zagged along the sharpie pen line a couple of times around on my sewing machine.
It’s very important that your patch be large enough to support the original backing beyond the damaged areas. That way, you arrest the process of weakening the original backing. By rehooking through both the old and new backing, you give the most support possible to the old materials.

I cut the patch out close to the zig-zag line, then hand sewed it to the back of the rug.
I hand sewed the old burlap down to the new, securing around all the holes. Then I trimmed away any loose strands of burlap (above). In the picture below, you can see the patch sewn in, ready to rehook the center section. Rather than try to reproduce the beige and gray original colors, I went with new greens and grays.

This is the whole patch sewn down.

Lillian after, 27”x45.” Wool fabric strips and wool yarn on burlap. Center section patched and rehooked.

The Sugar Shack before, 27.5”x38.” Rayon dress fabric and silk stockings on burlap. French Canadian, 1930s.
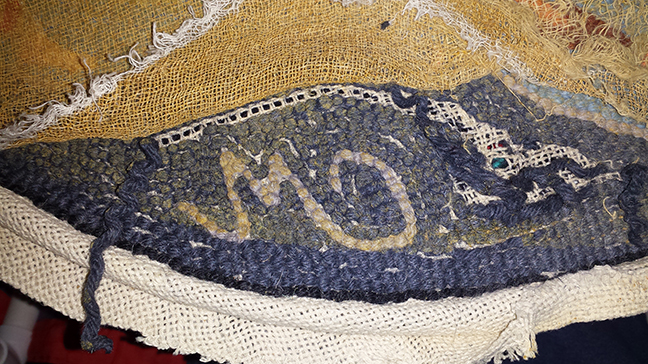
One of the coolest discoveries about this extraordinary rug was what I found when I unsewed the hem. Now, it’s not unusual for me to find some markings on the backing. Sometimes it’s the name of the company, the dimensions, or possibly even the name of the design. In this case, the markings on the burlap said, “Carbohydrates 66.00%.” So here we have proof that this design was hand-drawn on a feed sack, probably 80 or 85 years ago. The materials used support the age of this rug, common dress material and silk stockings. The hem was falling apart, but not surprisingly, the the rest of the rug was in excellent condition.

This wonderful scene, the tapping of the maple trees in early spring, the boiling of the sap, and the horse-drawn sledge carrying the barrel of precious syrup, has regional and historical significance. This rug has value as an old rug, first and foremost, but also, for the depiction of an age-old craft. On top of that, it was most likely made during the Great Depression, using materials that could be salvaged from faded garments or remnants of hand-sewn dresses, and an old feed sack. All of the wonderful traditions of rug hooking are contained in this magnificent example of North American history.

There was a wool braid which had been sewn all along the top of the rug to cover the broken burlap along the foldline. Once removed (above), the state of the edge was clear. As with any damage to the backing, I unhooked until I found healthy backing, sewed in a patch, and rehooked through both layers.
I’m not always able to rehook with the original strips, but in this case, the rayon dress material found in the border was quite durable, so I didn’t have to come up with yarn to match it’s unique appearance. Rayon was invented around 1910, creating durable threads from wood pulp, of all things, which became the iconic dress material of the 1930s and beyond. It was durable and practical, with that wonderful drape we associate with dress-making of the period. The silk stockings, hooked into the maple and the evergreen trees in the background, show the skill of this intepid rug hooker, undaunted by her lack of raw materials. She created beauty with what she had available, bless her creative heart.

Here you can see the unsewn hem and unhooked border until I got to healthy backing (view from the back). I created a patch, just like I did with Louise, then I rehooked the border. In this case, I was able to rehook the original strips. Then I bound the edge, and did a new hem. There were a few tell-tale strips that had pulled through to the back, I simply pulled them through to the top and trimmed them.

The Sugar Shack after, 27.5”x38.” Rayon dress fabric strips and silk stockings on burlap. French Canadian, 1930s.

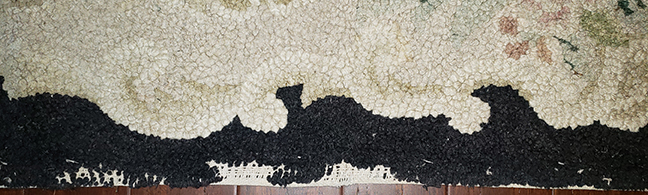
Katharine before, 36”x24.” Wool yarn on burlap. Before (above), you can see the typical unraveling of the folded under hem. Below, you can see how much the damage had spread into the body of the rug once I unhooked the light blue border.
The plan with the Katharine rug was to unhook the medium blue outer border, sew in a patch, and rehook the border with new yarn.
With the rug lying face down, I pinned in a new piece of burlap, and drew along the pins to mark the patch (above). On my sewing machine, I zig-zagged the burlap patch along the sharpie pen line, then trimmed the inside section out of the patch. I hand sewed the patch to the back side of the rug first, then sewed the top all the way around the raw edges of the original burlap.

This rug was small enough that I could reinforce all my hand sewing at my sewing machine without putting too much stress on the rug shoving it around to get it under my machine.

I then rehooked through both layers with new yarn, in a slightly brighter, variegated blue. This is a good example of when it’s easier to get a good result by rehooking a section, rather than trying to match a color. I bound the edge and did the hem.

Katharine after, 36”x24.” Wool yarn on burlap. Patched, rehooked, and with a new bound edge.

Maggie before, 27”x41.5.” Wool fabric strips on burlap.
As you can see above, Maggie had the typical fraying along the folded edge that we so often see on old rugs. Sometimes, we have a choice as to how to approach the repair. The first step is to unhook until you get to healthy backing (below). The raw edge of the burlap is where the foldline was.
We were lucky that the break in the burlap was limited to the foldline in this case. Often it spreads farther into hooked area. So I could either sew in a patch, and hem it to the original size, or I could reduce the size a little bit, and bind the edge over the healthy burlap. That was how I approached this fix.
I unhooked the outer two rows of hooking. Then I decided to try the hem tape method as opposed to whip-stitching.
Below, you can see that I sewed the hem tape in next to the hooking, on top of the burlap selvedge. There was still a small gap between the black tape and the hooked row, but as often happens with old rugs, the wool strips weren’t in good enough shape to be rehooked, so I hooked in one row of black yarn to fill in the gap.
Then I wrapped the selvedge around a cotton cord and tacked it into place. All I had to do after that was sew down the hem tape in the back. No need to whip-stitch with matching yarn. So this method had the added benefit of being quicker, (less expensive) while still protecting the edge from wear.
And actually, this method didn’t reduce the overall size of the rug, because the bound edge added 1/2” all the way around.
It turned out well, I thought. It was easy to find a color of the hem tape that would harmonize with this design. With other rugs, I might not be able to get a close match with hem tape.
Maggie after, 27”x41.5.” Wool fabric strips on burlap.

Marcus before, 38” diameter. Wool fabric strips on burlap, with a cotton fringe decoration.
In this case, we again went with reducing the overall size of the rug, as opposed to trying to match the color of the background, or adding a hooked border. The owner was more interested in preserving the look of the rug. As long as it still looked like the old rug they had as kids, a slight reduction in size was good enough. It was also the less expensive option.

Marcus, after. 35.5” diameter
So I unsewed the hem, and removed the old fringe decoration. I then unhooked until I got to healthy backing. I prefer to have 1/2 to 1 inch of healthy backing to be sure I have put a stop to the weakness and prevented future damage. I wrapped that backing around a cord, whip-stitched with a dark pink yarn, and sewed down the hem in back. Then to make it look more like the original, I added a new fringe decoration.

Tiger before, 36”x24.” Rayon strips on burlap.
This rug was probably hooked in the 1940’s. The design comes right out of the popular culture of the day. There was a great fascination with exotic locations, jungles, tropical islands and such. But also because of the unusual material that it was hooked with, rayon dress material, which makes sense. During the war, people were encouraged to reuse and recycle. If new wool couldn’t be found, they would hook with what they had.
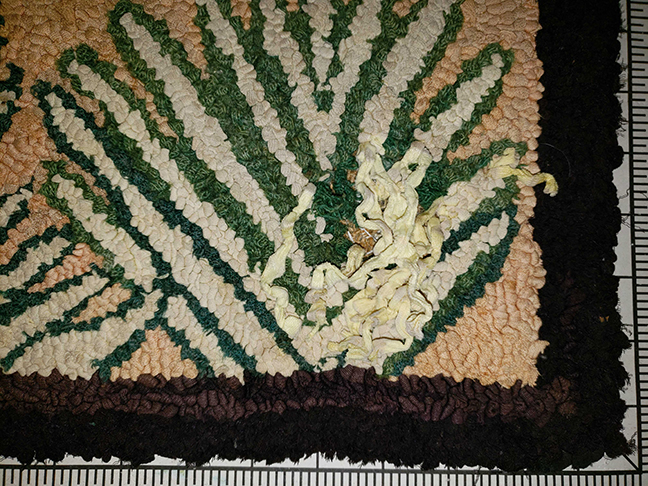
In addition to patching and rehooking a small hole in the lower right-hand corner, I also offered to bind the edge, but the owner declined, saying she intended to hang the rug in the future (more about that later).
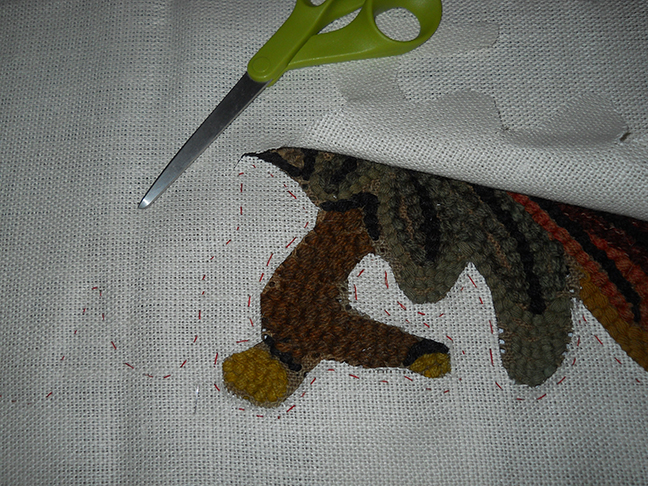
My first task was to repair that small hole

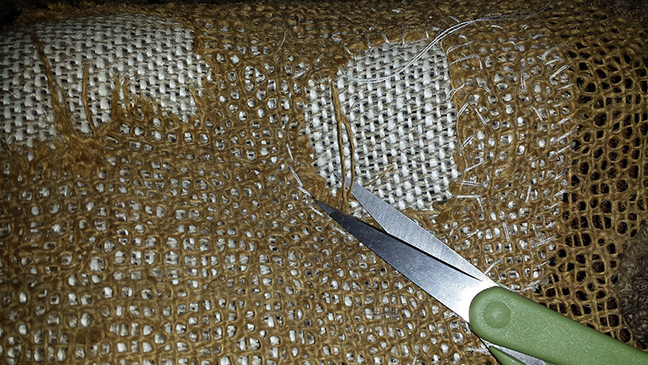
I unhooked around the hole and pulled the extra strips to the back (above left). I cut out a small patch of burlap, reinforced it with zig-zagging (above) and sewed it into the back, and then to the front of the rug (below).
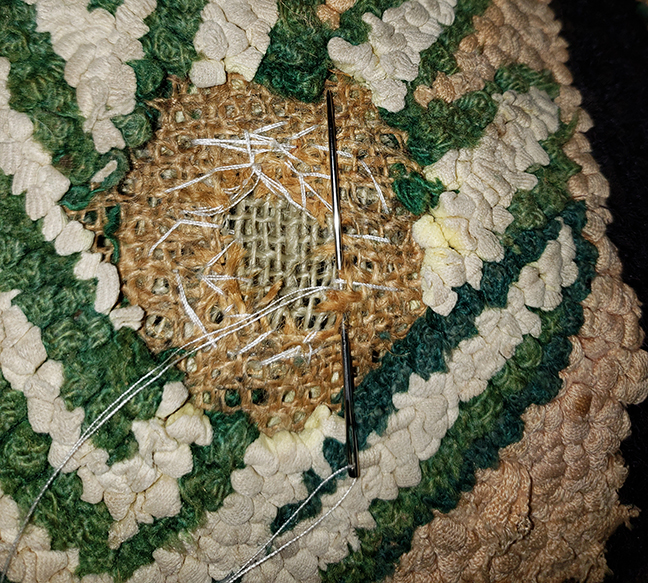
The original strips were too bright to be rehooked. They’d been spared the wear and tear for long enough that they looked more like the bright vibrant colors on the back of the rug. So I rehooked the ferns with matching yarn.
The material this rug was hooked with was heavier than either wool fabric or yarn, so hanging the rug was going to be problematic. If I were to sew in a casing at the top, and let the weight of the rug pull down on the old burlap, it would probably cause it to break down. So I suggested reinforcing the back with hem tape, to spread out the weight, so no one part of the old burlap would have to carry too much (below). Doesn’t it look like I trapped the tiger in a cage?
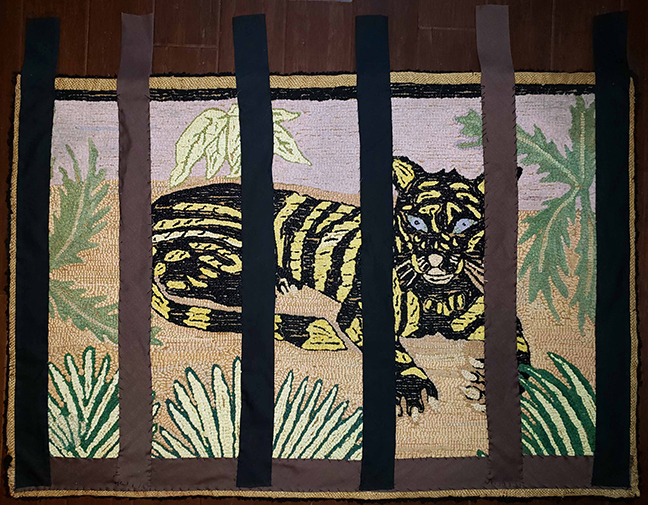
I sewed a plain black material over the back of the rug to cover the hem tape. You can see that I left extra hem tape on the top. I sewed that into the black material, so the hem tape is taking all the weight around the casing for the rod.
If I wanted to hang a rug of this size that was hooked with yarn, it wouldn’t weigh nearly as much. I usually hang them on tiny nails without heads (brads). You can poke the little nail through the backing, just like you poke your hook through, then tap it in place until you can’t see the top of the brad anymore. I would run 5-6 brads across the top, and if you want more support, you can run some nails across the middle as well. I wouldn’t hang a rug this way right behind the couch, or somewhere where it will get bumped or played with by the kitty.
The back of the Tiger rug, with the fabric cover and casing on top for a rod.
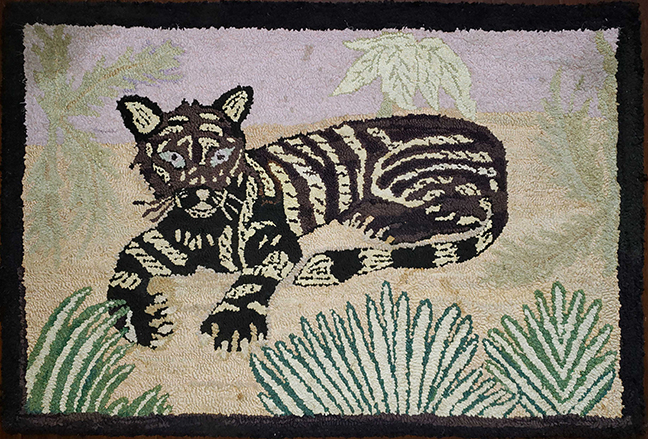
Tiger after, 36”x24.” Rayon strips on burlap. Patched and reinforced for hanging on the wall.

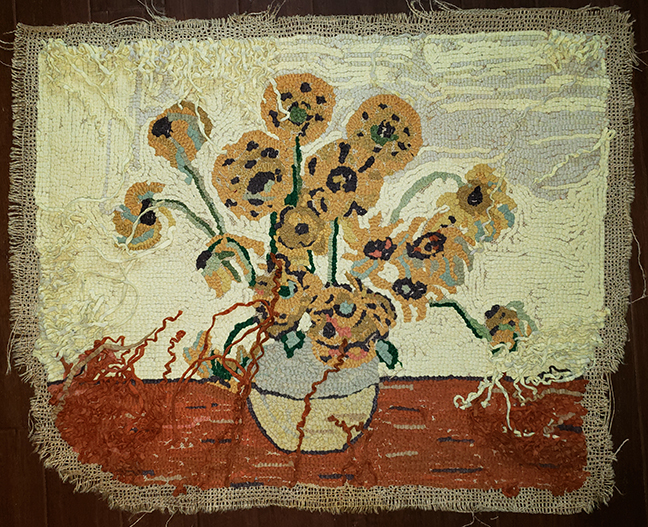
Van Gogh before, 23.5”x24.” Wool strips on burlap.
This rug was one of a pair of rugs, both of which needed some repair on the edges. The goal of the owner was that they should be repaired so they will still have the same height and width, and still fit in the place where they lived.
While the burlap had worn away on the Van Gogh rug, the original wool strips were still there. However, the unhooked strips were brighter than the hooked rug, because they had been tucked underneath for a while. I found that when I started rehooking the strips, the orange was noticeably brighter. To avoid the obvious color change, I suggested hooking in a new border, like a “frame,” but the owner didn’t mind if there was a difference in color. I found that by unhooking and then rehooking random strips out of the inner area of the rug brought some of the lighter orange into the whole area, and in that way, the brighter orange in the repaired area wasn’t quite so noticeable.
Here’s what the Van Gogh looked like from the back, when I unhooked to the healthy backing (above).

I reinforced the raw edge of the burlap on my sewing machine.

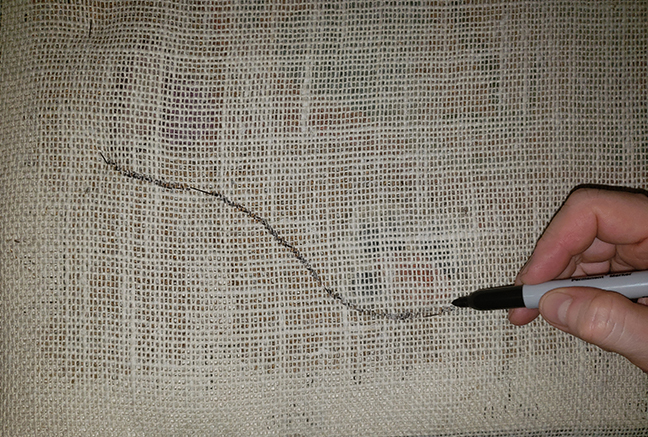
I laid the rug on its front and pinned in the burlap for the patch. Then I drew on the pinned line with the sharpie pen (above).

I zig-zagged a couple of times over the sharpie pen line. Then when I pinned it down on the rug again, I trimmed out the center, inside the zig-zag line.

I hand-sewed the patch to the back of the rug (above).

Then I hand-sewed the old burlap to the patch from the top.
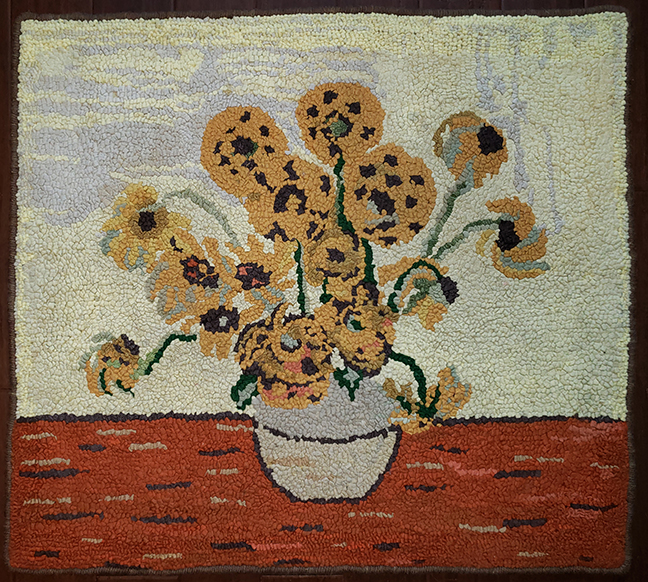
Van Gogh after, 23.5”x24.” Here you see the patched rug, rehooked with the original strips (I ended up using every scrap!) and the edge bound and hemmed. Even though there is a variation in the colors along the edges,
it looked somewhat “impressionistic,” so a pleasant result.
If a hooked rug shows signs of pulling out, or raveling or wearing thin, it should be examined at once and carefully repaired by a competent worker. Sometimes the basic material grows flimsy or weak or even rotten with age or misuse and a stitch or loop in time saves more than nine loops. Repairs at this stage are not expensive, and much less than for oriental rugs.
William Winthrop Kent, The Hooked Rug, 1930

Deer Rug before, 23.5”x26.” Wool fabric strips on burlap.

This is the companion rug to the Van Gogh rug. We don’t know who hooked these rugs, perhaps they were done by the same person, or perhaps the owner just saw that they looked nice together.
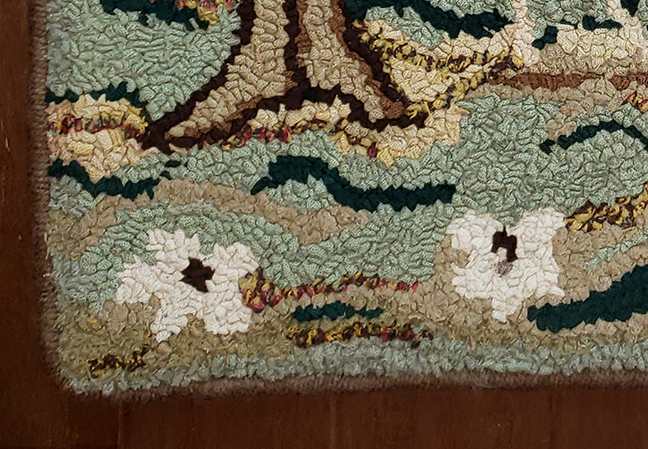
The Deer rug had that typical fraying along the folded hem, but the damage didn’t go beyond the foldline. So all that was required was to patch the rug, and rehook the strips to the same dimensions, so the pair of rugs would match up again.
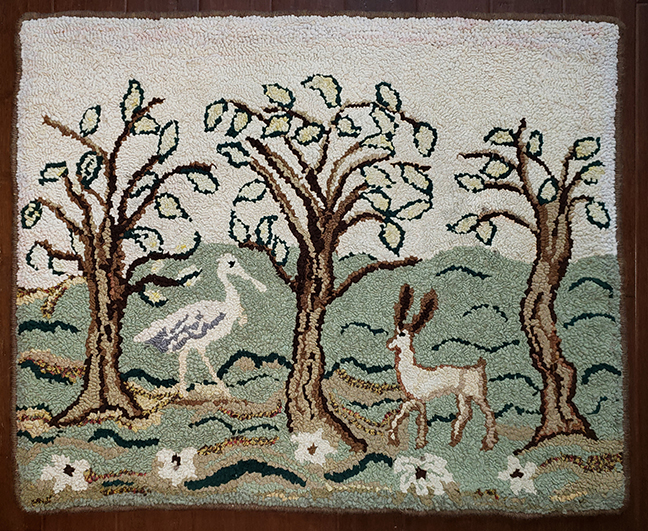
Deer Rug after, 23.5”x26.” Patched and rehooked, edge bound and hemmed.

The Deer Rug and the Van Gogh Rug return to their place of pride!
Donovan before, 32”x48.” Wool fabric strips on burlap.

For the Donovan rug, there was the normal fraying along the edge. I unhooked the border and unsewed the hem, then I sewed in a new reinforced patch. Here you see me beginning to hook a new border through both layers to match the border in the center section of the rug (below).

I noticed a small hole in the dead center of the rug. This is common, if the rug was ever folded up and kept in storage for a period of time, It’s always a good idea to check the midlines, both side to side and top to bottom for any weakness along those lines.
It’s subtle to see it, but easier to feel the weak spot.

I unhooked the spot.

Here you can see the zig-zagged patch ready to sew into the back.

There wasn’t a way for me to disguise the repair, I just got as close as I could. Fortunately, it was a small repair, so not terribly noticeable on the floor (above). The important thing is that the damage won’t get worse now.
Donovan after, 32”x48.” Edge patched, rehooked and bound, and small hole in the center repaired.
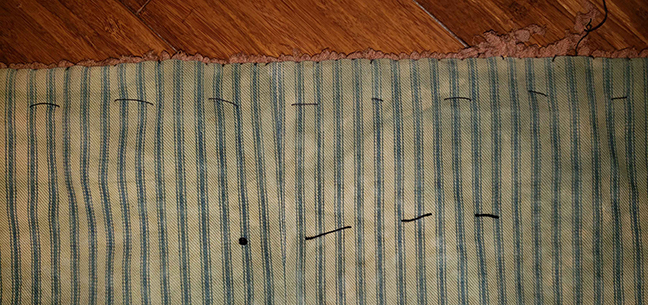
To prevent damage to an old rug from folding, it’s best to roll them up, design side out, and wrap them in a pillowcase or fabric if they have to be stored for a long period of time.

Judith before, 36”x60.” Wool yarn on cotton. 1940’s.
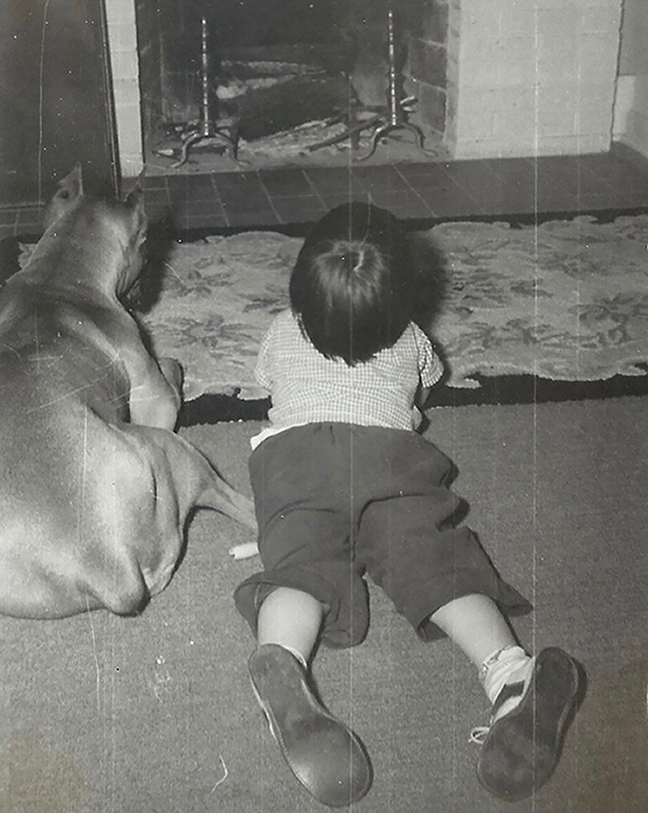
One of my favorite things about repairing rugs is the stories people tell. Here you see the owner of this rug when she was a little girl in the late 1940’s, relaxing on this very rug in front of the fireplace with the family dog, Cindy. Doesn’t she remind you of Scout from To Kill A Mockingbird?
First, the outer edge. The cotton backing was intact, so I didn’t need to patch it, but the yarn had worn down along the edge. Since it’s my preference to rehook a section rather than trying to match the exact color, I unsewed the hem, unhooked the old yarn, and rehooked the black border with new yarn. Then I bound the edge with the same yarn, and sewed down the hem.
There were a few small spots where the yarn had pulled out, with no damage to the backing, so I just filled those in, matching the colors as closely as possible.

Judith after, 36”x60.” Border rehooked, edge bound and hemmed. Good as new!

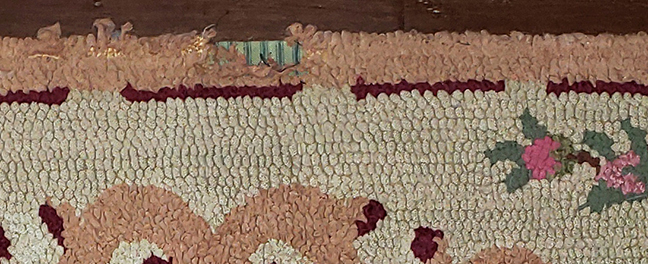
Mattie before, 35”x61.” Wool yarn on cotton.
This is the rug shown earlier, the one that had been put through the washing machine. The result was that some of the gray/green background washed away, and most of the rest of the rug got felted together (meaning the woolen fibers got bound together permanently, hence the name, Mattie!). Thankfully, the rug was hooked on a cotton backing. It would not have survived the washing if it had been hooked on burlap, but still, not an ideal treatment. On the plus side though, it was exceptionally clean!
Mattie after, 35”x61.” With a new tan border and bound edge.
I unsewed the hem and unhooked the gray/green yarn around the outside, leaving the green background in the center. Then I filled in the border with a new yarn, in a tan color. I bound the edge with the same color and sewed down the hem.
It is still a serviceable rug, with many more useful years to come, but it will need to be treated carefully when vacuuming or washing in the future.
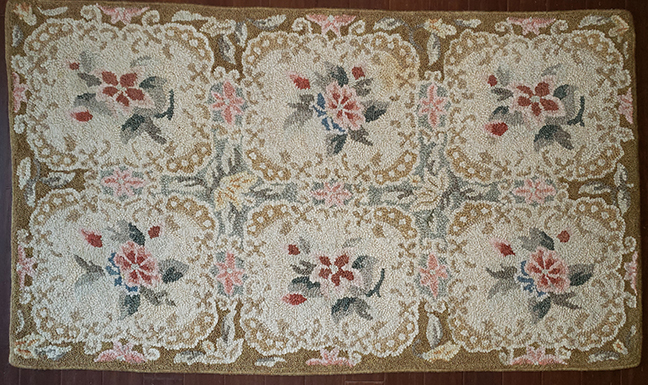
Delilah before, 27”x42.” Unfinished, wool fabric strips on burlap.
Delilah is a good example of the overlap between finishing someone’s unfinished project, and repairing a rug. In each case, you need to get into the creative mind of another person you’ve never met. It can be surprising to see colors the way someone else sees them. While finishing this rug, I pulled down all the colors I thought would work, the colors I thought were the same as the original colors. But once I started hooking, my colors looked much too bright! I never thought my color palette was all that bright, but next to the muted, soft colors in this rug, my colors stuck out. I kept going back to my workroom, trying for softer colors. By the time I finished the hooking, I had a mountain of bright yarn on the couch next to me!

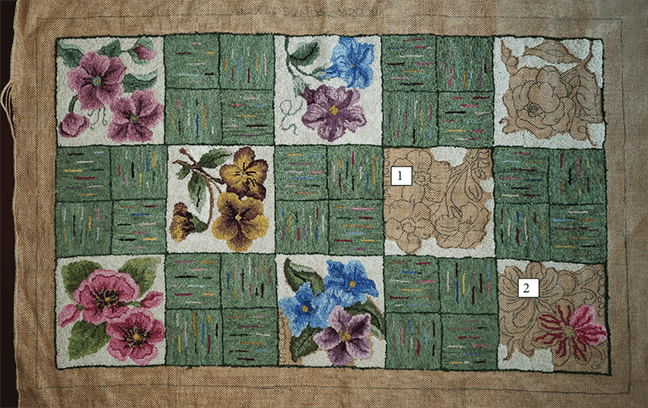
I decided to unhook the small amounts of the white background in two of the unfinished blocks (1 and 2 above). That way, I could use the original white strips to fill in the little unhooked spots of background in the remaining blocks. Then I could hook blocks 1 and 2 with new yarn, so the slight difference in the white backgrounds would not be so obvious.
- Unfinished block
- Same block, filled in with white wool strips, and the center of a purple flower

- Unfinished block, just needed a bit of white in the lower left corner by the leaf
- Same block, filled in
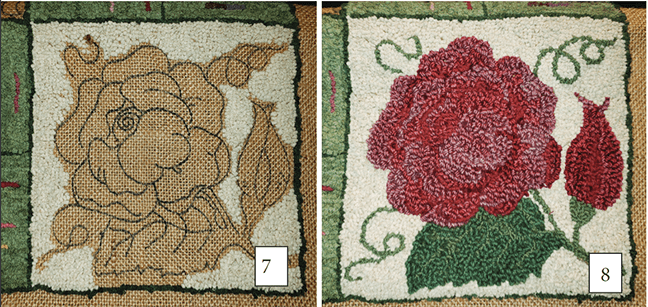
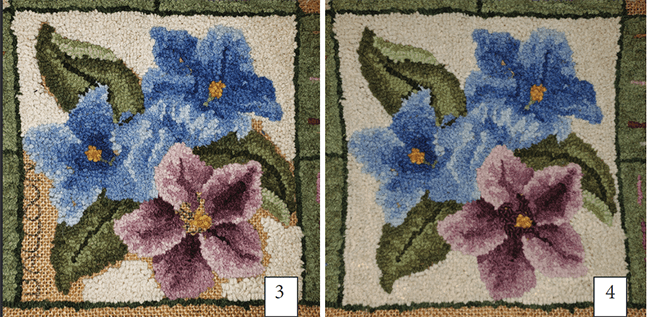
- Unfinished rose and background
- Finished block, with wool strips for the background and yarn for the rose and stem
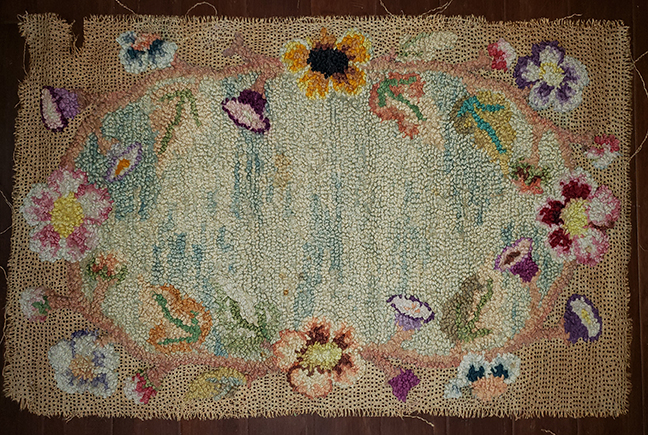
Delilah after, 27”x42.” Wool strips and yarn on burlap. With a variegated red border, bound edge and hem.
Virginia before, 23”x38.” Wool yarn on cotton, shown here front (above) and back (below).

As you can see, Virginia was badly overpacked. This is one of the key differences between hooking with yarn and hooking with fabric strips. Wool strips tend to fold up on the top in neat little rectangles, but yarn is lofty and round, and needs to spread out above the backing. This is part of what keeps the loops in place, anchoring them to their spot. So if you overpack with yarn, not only are you wasting yarn, you are creating a hazard that someone could trip on.

One of the first things I noticed about this rug was how heavy it was. It weighed about 5 pounds. My yarn-hooked rugs in the same size weigh 2.5-3 pounds.

I unsewed the hem and unhooked the rust background. The yarn was still in good shape, so I rehooked with the same yarn. I took 17 ounces of yarn out, and rehooked the section, using only 6 ounces!
I think the reason this rug was so overpacked was because the loops were too high. Not only is there an ideal spacing of loops with yarn-hooked rugs, but an ideal height as well.
If yarn loops are too high, they seem loose and floppy, like there’s nothing holding them in place. You could easily imagine snagging the yarn if the loops are too high. So I suspect the hooker was compensating for the floppiness of the loops by overpacking them. It worked, as far as it went; you would have to try very hard to dislodge a single loop, but you couldn’t put this rug on the floor for fear someone might trip on it.

When I came in with the new loops, I had to start at the original height, and work my way down to the ideal height (above).

So yarn loops need room to spread out and they need to be anchored in place. In this picture (above), the loops on the left are too short. They don’t spread out on top. You could easily push them through to the back, so nothing anchoring them in place.
The loops in the middle are too high. They don’t spread out on top, you could easily push them over with the side of your hook. So they’re not secure either.
The loops on the right are ideal. As Goldilocks would say, they’re “just right.” They look like little balls sitting on top of the backing. They spread out on top, filling in the space. If you push on them with the side of your hook, they stay put. So there’s a balance with yarn hooking, between getting your loops far enough apart that you can’t see the backing from the front, but not so densely packed that the rug won’t lay flat.

Another way to check if you’re overpacking your loops is to look at the back of the rug (above). You should be able to see backing between the rows. You don’t see that from the top because the yarn fills in the space.
The white yarn in the center is still overpacked (no gaps), but not puckering up, because of another special quality of wool; it has memory. It has been crowded in so long, it has compacted, held in so tightly by the background section. But there was nothing holding the background in, so the rug curled on the edges.
Can’t you just hear this rug breathe a sigh, now that it has room to relax on the floor?

Virginia after, 23”x38.” Wool yarn on cotton. The outer background is rehooked, laying nice and flat, with a bound edge and hem.
Autumn Leaves before, 32”x50.” Wool fabric strips on burlap.
Autumn Leaves had worn edges, like so many old examples. The damage had spread into the body of the rug, so I knew I would need to patch carefully.

The first thing I did was to unsew the hem and identify all the damaged areas (above, showing the back of the rug). This was another project where it made more sense to rehook the entire black/brown background. It was also necessary for me to rehook a few leaves and stems. I needed to create a patch that would support the whole background area.
Because I wanted to get in as much of the background as I could into the patch, I tacked the burlap to the unhooked background area, and cut the center section out (above). Then I carefully zig-zagged the raw edges of the burlap so it wouldn’t unravel during the hooking process.

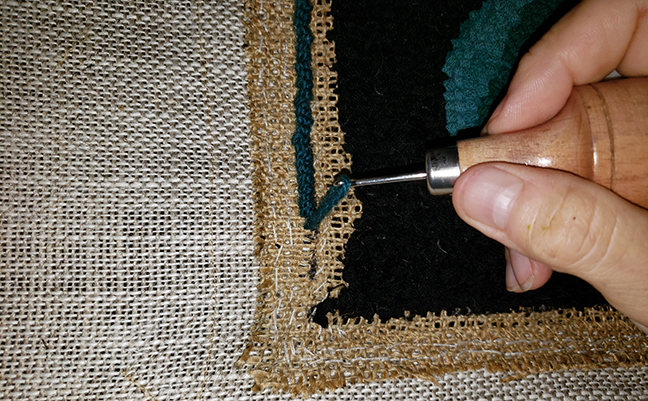
I drew in notches all around, so I could put the “puzzle” back together. Then I tacked it down to the back first, then to the front, sewing the old burlap down to the patch (above).

Here’s the rug from the top (above), unhooked, the original backing sewn down to the patch.
Then I started rehooking with yarn through both layers. In the picture above, you can see that some of the stems and leaf were patched and rehooked as well.
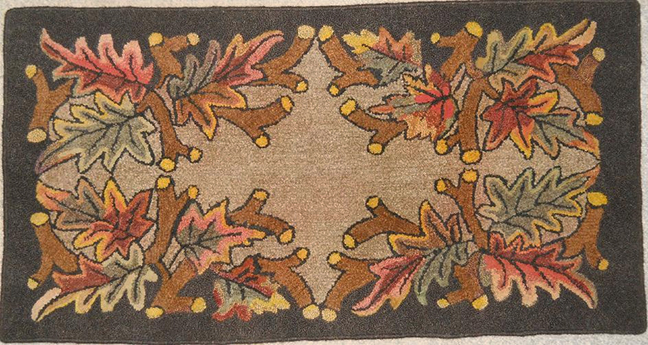
Autumn Leaves after, 32”x50.” Wool strips and yarn on burlap. Border patched and rehooked, edge bound and hemmed.

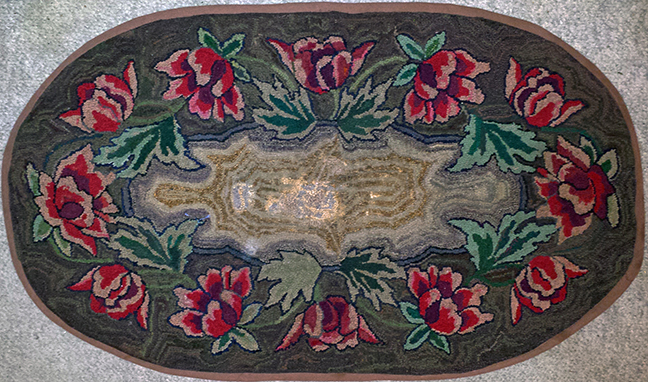
Rosalinda before, 47”x30.” Wool strips on burlap
Notice that the two places where the damage encroached beyond the folded hem were along the center line.
Cotton fabric sewn into the back (above). It might have been sewn in when the rug was made, but probably those long running stitches were added after the edge started to fall apart.

Here you see a close-up the border unhooked, and the new burlap sewn in.

Here you see the full patch sewn in. The rug was probably stored after the folded edge started to unravel. Then the foldline along the center of the rug caused the damage to spread.
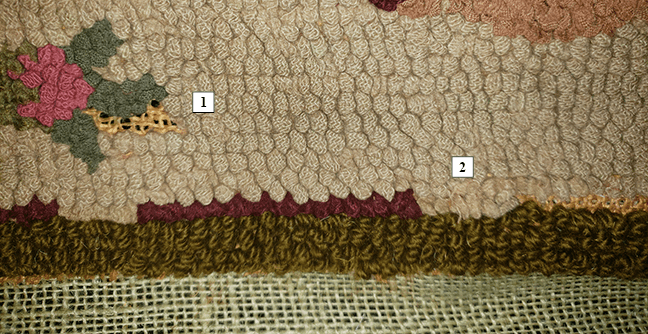
I rehooked some of the beige strips I had taken out, but I needed more.
Instead of trying to come in with a new color, I grafted a little beige from around a nearby leaf (left, #1) and moved it to the outer border of the beige area (left, #2).

The other leaves were hooked with lots of shades of green, so I filled in the leaf with a medium green.

And lastly, I came in with a new red row. I used the same red yarn to bind the edge of the finished rug.
To avoid the mis-matching of that original peach border color, I went with an avocado green.
Rosalinda after, 47”x30.” Wool fabric strips and yarn on burlap, with a new border, bound edge and hem.
Next Chapter: Working With Yarn
